KUKA KR 3 D1200 (Standard Delta Robot) Assembly Instructions
Product Description
System composition
Robot arm body+KR C5 micro control cabinet+smartPAD-2 teaching pendant+power/data cables+system software; The option only provides eyebolts, without HM version sealing kit or original stainless steel mounting base.
Mechanical Structure of Robot Arm Body (Delta Parallel)
Base frame: Built in A1/A2/A3 three drive motors, with an electrical interface board arranged at the rear;
3 upper arms, each connected to 2 forearms through a gear mechanism; The spring component is used to connect and fix the forearm, and there is elastic potential energy present;
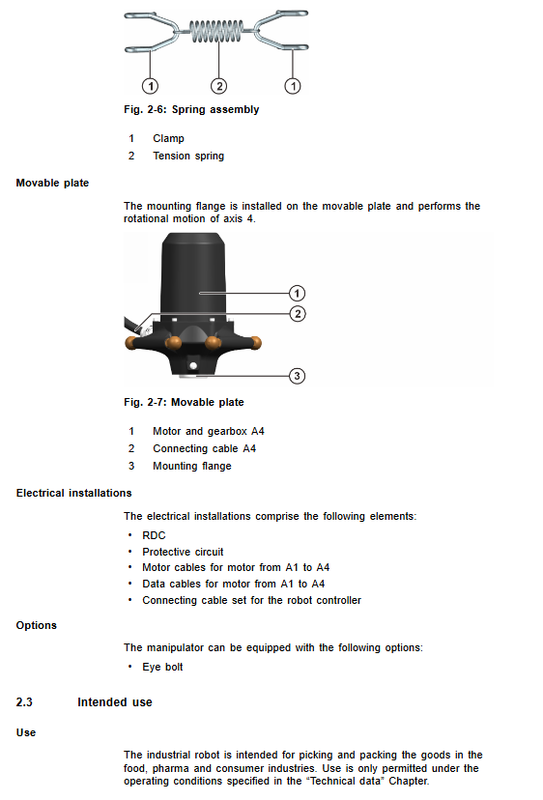
6 forearm linkages; Movable plate (end motion platform), equipped with A4 rotating shaft motor reducer assembly, output tool installation flange;
Electrical system: RDC analysis unit, protection circuit, A1-A4 motor cables, data cables, prefabricated A4 axis cable assembly.
Designated use and prohibition of misuse
Designated use: The picking and packing operations in the food, pharmaceutical, and consumer goods industries must strictly comply with the environmental parameters specified in the technical manual.
Prohibition: Direct contact with food by the body; Manned/animal; Climbing pedals; Outdoor, explosion-proof, radioactive, and underground mining environments; Unauthorized drilling and modification of the main structure by KUKA (resulting in direct loss of warranty).
The main body is a partially completed mechanical device and cannot be directly put into operation independently. It must be integrated into the entire set of equipment to complete CE.
Security Chapter (commonly used with HM version, with differences highlighted)
Legal responsibility: Randomly provide a Declaration of incorporation; The system integrator is responsible for overall risk assessment, EC compliance declaration, CE marking, and writing terminal operation manuals.
Personnel classification: integrators, operations and maintenance personnel, operators, and cleaning personnel; The deep maintenance of the main body is only allowed to be carried out by authorized personnel of KUKA.
Definition of danger zone: danger zone=robot workspace+stopping distance; Prioritize physical fence/grating protection; Without physical protection, all requirements of EN ISO 10218 for collaborative robots must be fully implemented.
Protective device: A1-A3 axis can be equipped with adjustable mechanical hard limit; Brake release button; The nameplate and warning label of the main body are strictly prohibited from being altered or removed.
Key safety points
After power failure, there is a risk of the end platform falling due to brake failure; The maintenance must place the mechanism in a safe position and increase mechanical support if necessary; Personnel are prohibited from standing directly below the robot.
The high temperature of the motor operating casing poses a risk of burns.
Electric motors and brakes generate electromagnetic fields; Personnel wearing active implantable devices such as pacemakers must maintain a distance of ≥ 300mm (both power on and power-off are effective).
After disconnecting the smartPAD-2 teaching pendant, its emergency stop fails; The disconnected teaching pendant must be removed from the work site.
After modifying hardware, software, and parameters, all programs must undergo low-speed testing in T1 mode.
Fault handling: Power off, lock and tag, post fault warning labels, record faults; Complete the repair and perform a full set of security function verification.
Repair live parts: Emergency stop alone is not enough. The main power switch must be disconnected and the power must be checked to confirm the power outage; After the controller is powered off, the internal high-voltage capacitor will still maintain high voltage for several minutes.
Delta specific significant risk: It is not allowed to dismantle all three forearms corresponding to the upper arms at the same time, otherwise the movable end platform will directly fall and squeeze, causing injury; The spring component has a huge elastic potential energy, and strong pulling is prohibited.
Difference from HM version: The standard version does not have any safety clauses related to hygiene and cleaning.
Technical Data
Basic parameters of the whole machine
Project KR 3 D1200 (Standard Edition)
4 controlled axes (A1-A3 parallel+A4 end rotation)
Rated load 3 kg; maximum load 6 kg
Maximum working diameter 1200 mm
Repetitive positioning accuracy ISO 9283 ± 0.05 mm
The self weight of the body is about 105 kg
Protection level IP67 (without IP69K high-pressure flushing)
Noise<75 dB (A)
Installation method limited to ceiling lifting only
Controller KR C5 micro
Shell colors: Industrial Orange RAL2009, Light Grey RAL7035, Black RAL9005
Operating at an ambient temperature of 0-45 ℃; Storage -25~+55 ℃
Cable optional length 4 / 7 / 15 / 25 m
Axis motion parameters
A1/A2/A3: Range of motion -109 °~+42 °; Maximum angular velocity of 600 °/s
A4 rotation axis: ± 355 ° infinite rotation; Maximum angular velocity 840 °/s
Load and flange parameters
The maximum allowable moment of inertia of the flange is 0.03 kg · m ²; Provide load curve chart; Both the load mass and moment of inertia must be verified, and the data must be entered into the controller.
The flange load is divided into normal operating conditions and emergency stop impact conditions (axial force, radial force, overturning torque, rotational torque).
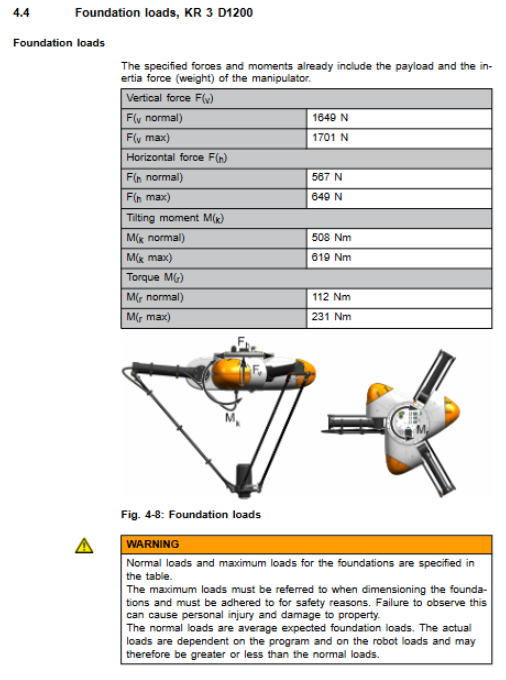
Base lifting force (including self weight and load of the body, the design must take the maximum value)
Load type, normal value, maximum value
Vertical force Fv 1649 N 1701 N
Horizontal force Fh 567 N 649 N
Overturning moment Mk 508 Nm 619 Nm
Torque Mr 112 Nm 231 Nm
Shutdown distance and downtime
STOP 0 (Type 0 shutdown: directly cutting off the drive brake) provides reference values for the X/Y/Z TCP shutdown distance and shutdown time.
STOP 1 path maintenance shutdown: Provide multiple sets of curve graphs, variables: load mass (33%/66%/100%), program speed POV percentage.
The manual values are only the average of simulation and testing; The actual stopping distance of multi axis composite motion will be greater; Brake wear is related to the number of STOP0 triggers; The shutdown distance must be measured on the project site, and it is recommended to retest it once a year.
Nameplates and REACH regulations
The nameplate information complies with the Machinery Directive; For information related to Article 33 of REACH, please refer to KUKA Xpert.
Project Planning
Conditions that can accelerate wear: long-term close to the upper temperature limit, abrasive dust environment, continuous full load operation, frequent start stop, short cycle reciprocating motion, continuous external process force. When encountering the above conditions, it is recommended to shorten the maintenance cycle and consult KUKA services.
Lifting pedestal planning
The standard version does not have an original stainless steel installation base and requires users to process hexagonal transition steel plates themselves. The document provides a complete set of processing drawings and recommends ordinary steel.
Factory position of upper arm+45 °; The structural design should ensure a minimum anti-interference distance of 300mm from the upper arm to the center of the robot; If not met, the upper arm needs to be lowered using the brake release button before installation.
Bolt specification: Robot fixed to hexagonal plate: 12 × M8 × 30-8.8; Hexagonal panel fixed to user ceiling frame: 9 × M16 × 40-8.8.
Layout suggestion: The robot should be arranged at a 30 ° angle relative to the conveyor line to optimize the load distribution.
A4 cable assembly: strictly arrange cable clamps according to the dimensions on the drawing; The installation size of the cable clamp directly affects the lifespan of the cable.
Cable interface: X30 motor cable, X31 data cable; Equipotential grounding must be done, and magnetic rings must be added to the data cable joints; The minimum bending radius of the cable strictly follows the manual.
Transportation
The prescribed transportation posture is A1/A2/A3=+45 °; A4=0 °, which must be entered before packaging and transportation.
Two ways of handling: forklift transportation of original packaging boxes; Lifting ring+crane lifting body (with 4 M8 lifting ring bolts screwed into the base).
Dismantle tools and tie cables before lifting; The rated load of the lifting equipment must be greater than the overall weight of the machine; Prevent collisions and impacts.
Startup and Re commissioning (Complete Ceiling Lifting Process)
Preparation tools: crane, torque wrench, hexagon socket kit, eyebolt.
Main installation steps: 1) Fix the user made hexagonal panel to the ceiling user frame; 2) Screw the base into the lifting ring, lift the robot body with the crane, and maintain the transportation posture; 3) Positioning pin positioning, 12 M8 × 30-8.8 bolts are diagonally tightened with a torque of 23 Nm; 4) Connect the equipotential grounding wire, motor cable X30, and data cable X31, and add a magnetic ring to the data cable; Complete the equipotential continuity test; 5) Press the release button of the base brake and manually adjust A1-A3 to a horizontal position; ⚠ The brake release state poses a risk of falling, and personnel are prohibited from standing below; 6) Install the forearms one by one, and it is strictly prohibited to remove three forearms at the same time; Pay attention to the risk of elastic potential energy during the installation of spring components; 7) Assemble the entire A4 cable assembly and strictly position all cable clamps according to the drawings; Tighten the bolts to the specified torque.
Before powering on, check that all fasteners and cables are not pulled or worn; Complete safety circuit; Change the default password of the system; All programs must be tested in T1 mode.
Special tool: Optional external brake release device, used for manually moving the robot body in emergency situations where the controller is completely powered off.
Maintenance
Compared to HM Health Edition: Standard Edition does not have IP69K high-pressure flushing; Only regular cleaning is allowed, and food hygiene specific cleaning procedures cannot be used.
Maintenance cycle maintenance project
Tighten the hexagonal mounting plate bolts for the first 100 hours of operation; M8=23Nm,M16=78Nm
Replace the casing cover within 5000 hours or at the latest 1 year; Visual inspection of upper arm; Replace bearing components
20000 hours or at the latest 5 years, visual inspection of the forearm (replace immediately if cracks appear); Appearance inspection of A4 cable assembly, if damaged, please contact KUKA for replacement
Important rules for bolts: Once high-strength bolts of 10.9 and above are loosened, they must be replaced directly and must not be reused.
Disassembling hard safety: The forearm must be disassembled and assembled individually, and it is forbidden to dismantle three at the same time; The spring component cannot be pulled forcefully.
The maintenance chapter provides a complete step-by-step disassembly process: replacement of the housing cover, replacement of bearings, disassembly and assembly of the forearm, disassembly and assembly of the upper arm, and complete replacement of the A4 cable assembly (standard working hours are about 45 minutes).
Cleaning: Turn off the power and press the emergency stop button to clean. Do not use high-pressure water guns or steam cleaning.
Maintenance
Maintenance work beyond the description in this manual is only allowed to be carried out by authorized personnel of KUKA; After the repair is completed, a complete safety and functional test must be conducted.
Discontinuation, Storage, and Scrap Disposal
Deactivation: Adjust the mechanism to transport posture; Dismantling tools; Disconnect the A4 cable assembly; Remove each forearm one by one; Complete machine disassembly.
Storage environment: dry and dust-free, avoiding condensation; Sealing and protection of electrical connectors.
Scrap classification: As electronic waste, motors and RDC circuit boards are prohibited from disassembling motor gearboxes on their own; Bearings, seals, and cables are treated as ordinary industrial waste; The appendix lists all grades of sealant, gear oil, and lubricating grease materials.