KUKA Robots KR QUANTEC-2 K and KR QUANTEC-2 P With K-F and P-C Variants Assembly Instructions
K=Long reach; P=Ground installation; P-C=Ceiling installation; Contains F Casting Foundry variants. Model List: KR120 R3500‑2 P / P‑C、KR120 R3900‑2 K、KR180 R3500‑2 K / K‑F、KR210 R3300‑2 K / K‑F、KR270 R3100‑2 K / K‑F; Adapt controllers KR C4, KR C5, KR C5-2. The main body is equipped with a liquid gas energy storage balance cylinder (PED Class I pressure equipment) as standard; The P-C version supports suspended ceilings, while the other K models are limited to floors only. The whole book consists of 13 chapters.
Product Description
Body structure: 6-axis serial joint robot; Core components: Inline hollow wrist, boom, connecting rod arm, rotating column, base, hydraulic pneumatic energy storage balance cylinder, micro RDC electrical components. A1-A3 is equipped with mechanical hard stops only for equipment protection and cannot be used as personal safety protection. Personal protection relies on the controller’s Safe Robot safety function or optional mechanical axis limit.
Variant Description
P: Ground installation; P-C: Ceiling installation, only KR120 R3500-2 supports ceiling installation;
K: Long working radius ground aircraft models;
– F: Cast Foundry version, strengthened dust and heat resistance, supports PURGE internal positive pressure blowing, and the wrist can withstand high temperatures of up to 180 ℃ for a short period of time.
Installation constraint: KR120 R3500-2 supports both ground P and ceiling P-C simultaneously; The remaining K series models are only ground mounted, with a base that allows for ± 0 ° tilt and does not support ceiling/wall mounting. The suspended ceiling model must have the suspended ceiling posture configured within the WorkVisual software.
Expected use: handling tools, workpieces, loading and unloading; Environmental conditions must be met.
Prohibited misuse (loss of warranty due to misuse): Climbing and trampling, overloading, carrying people and animals, outdoor activities, explosion-proof, radioactive, underground mining.
Wrist flange: ISO9409-1, ZH210/ZH300 two types of hollow wrists; The document provides flange axial force, radial force, and overturning moment under normal operation and emergency stop impact conditions.
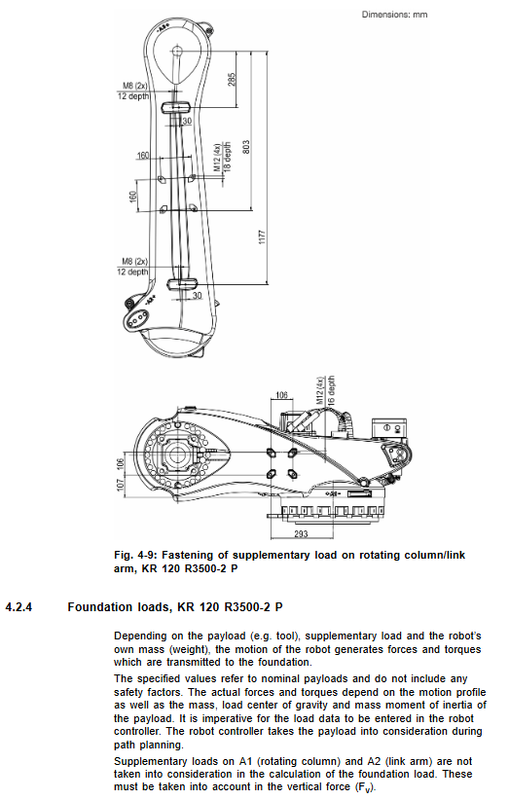
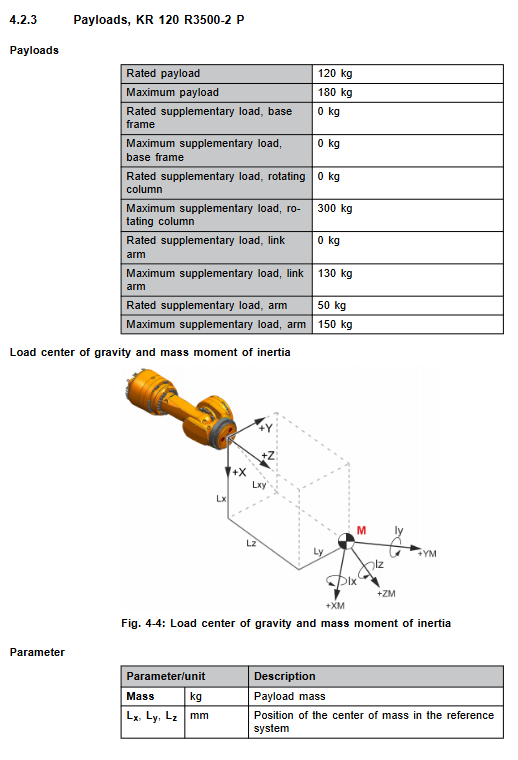
Additional load: Rotating column, connecting rod arm, and large arm reserved additional load installation interface; The foundation load of the main body does not include additional loads, and the foundation design must be additionally stacked.
Available options: brake manual release device, A1 mechanical limit, PURGE A/B/C/D casting blow kit, transportation hoist.
Technical Data
Include KR120 R3500‑2 P/P‑C、KR120 R3900‑2 K、KR180 R3500‑2 K/K‑F、KR210 R3300‑2 K/K‑F、KR270 R3100‑2 K/K‑F; Each model comes with an independent and complete parameter package.
Public basic parameters
Protection level: IP65 for the whole machine, IP65/IP67 for the wrist; The F casting version supports PURGE internal blowing; Noise level is less than 75 dB (A).
Operating temperature: 0-55 ℃; Storage -40~60 ℃.
Cable adaptation KR C4/KR C5/KR C5-2; Cable 7-50 meters, maximum length 50 meters; equipped with 16 mm ² equipotential grounding conductor.
Base installation hole S780, base shape 754mm; minimum grade of concrete foundation C20/25.
Summary of Core Parameters for Aircraft Models
Model rated load, maximum load, maximum arm span, body weight, repeated positioning accuracy, installation form
KR120 R3500-2 P 120 kg 180 kg 3505 mm 1281 kg ± 0.05 mm Ground
KR120 R3500-2 P-C 120 kg 180 kg 3505 mm 1283 kg ± 0.05 mm Ceiling
KR120 R3900-2 K 120 kg 146 kg 3904 mm 1280 kg ± 0.05 mm Ground
KR180 R3500-2 K 180 kg 228 kg 3505 mm 1256 kg ± 0.05 mm Ground
KR180 R3500-2 K-F 180 kg 228 kg 3505 mm – ± 0.05 mm Ground (cast)
KR210 R3300-2 K 210 kg 273 kg 3305 mm 1266 kg ± 0.05 mm Ground
KR210 R3300-2 K-F 210 kg 273 kg 3305 mm – ± 0.05 mm Ground (cast)
KR270 R3100-2 K 270 kg 344 kg 3105 mm 1260 kg ± 0.05 mm Ground
KR270 R3100-2 K-F 270 kg 344 kg 3105 mm – ± 0.05 mm Ground (cast)
Complete output for each model: axis motion range, maximum speed of each axis under rated load, load curve diagram (must be verified by KUKA-Load software for quality, center of gravity, and moment of inertia, and entered into the controller); Wrist flange load (normal, emergency stop impact); Column/boom allows additional load; Foundation load (vertical force, horizontal force, overturning moment, A1 rotational moment); Side view and top view of the work envelope.
Stop distance and stop time
Distinguish between STOP 0 (category 0 uncontrolled emergency stop) and STOP 1 (category 1 controlled shutdown); Provide A1-A3 axis stop angle and stop time curves under different POV program magnifications, extension lengths, and load conditions.
STOP 0 is the reference value for simulation and testing; Composite axis motion will increase the stopping distance; It is recommended to check the stopping distance at least once a year for brake wear, and on-site measurements should be taken based on actual working conditions.
Other
Location of nameplates and warning labels on the main body; REACH regulation information retrieval instructions.
Planning and Design
Provide 3 sets of floor/ceiling installation plans, with a minimum concrete foundation grade of C20/25:
Standard centering base kit S780 (part number 0000-327-118, 58.5 kg): concrete foundation, base plate+locating pin+M24 bolt+chemical anchor bolt; If the foundation is uneven, it is allowed to level the mortar, and it is strictly prohibited to pour mortar into the bolt holes.
150 mm raised base S780 option: Raise the robot body.
Rack direct installation kit: installed on the customer’s steel structure/slide table; Cylindrical pin+flat pin positioning; Tighten 8 M24 bolts diagonally in steps.
Cable planning
KR C4: Motor cable X20-X30; Data cable X21-X31;
KR C5/C5-2: Motor cable XD20-XD30; Data cable XF21-XF31;
Minimum bending radius of cable; Separate the wiring of motor cables and data cables; The external interface A1 of the main body is located at the rear of the base; Equipotential grounding must be completed in accordance with VDE 0100 and EN 60204-1.
Long term extreme operating conditions (high temperature, high frequency start stop, continuous full load) will accelerate component aging, and maintenance cycles need to be shortened. Consult KUKA services.
Transportation
Mandatory standard transportation posture, with all models providing angles for each axis; The transportation of P-C ceiling models also requires placing them in a transport posture.
Transportation method
Forklift: Base fork groove, forklift carrying capacity ≥ 2 tons; Priority should be given to using transport frames for ceiling models;
Crane lifting: use official lifting equipment kit; Remove tools and pipeline packages before lifting to avoid center of gravity deviation.
Avoid impact and vibration during transportation; Prohibit non certified lifting points from lifting; Each model provides the center of gravity coordinates.
Chapter 7 Startup and Re Debugging
Coverage conditions: standard centering base ground, 150mm raised base ground, frame steel structure ground, P-C suspended ceiling frame installation.
General process: Place the lifting device in place → Clean the installation surface, install the positioning pin → Position the robot → Tighten the M24 bolts diagonally in multiple stages; If necessary, grout and level; Dismantle the transportation lifting equipment.
Wiring specifications
Grounding M8 nut specified torque;
The tightening torque of the motor cable is 3 Nm; the data cable buckle must be fully locked in place;
The wiring is completed and a complete equipotential conduction test is performed.
WorkVisual software confirms the robot installation posture (ground/ceiling).
Balance cylinder exhaust: Move the A2 axis back and forth to release the accumulated air inside the cylinder, preventing the protective cover from popping out and injuring people.
T1 mode low-speed whole machine trial operation; Provide complete KR C4 and KR C5 motor/data cable pin allocation drawings.
Maintenance
Only allow maintenance items listed in the manual to be executed; The remaining repairs will be handled by KUKA certified engineers; Gearbox oil model: Optigear Synt. ALR 150.
Maintenance cycle benchmark
First 100 hours of operation: recheck the torque of all fasteners and bolts;
5000 hours or 1 year: Balance cylinder pressure detection, bearing lubrication; Visual inspection of A1 cable components;
20000 operating hours or 5 years, whichever comes first: replace all gearbox oil; A1 cable sheath lubrication;
The balance cylinder must be replaced as a whole after 10 years (mandatory safety requirement for PED pressure components).
Key points for oil change operation
The gearbox must be in a working hot state; Ventilate and release pressure before draining oil to prevent scalding caused by hot oil splashing; The magnetic drain plug specifies the tightening torque.
If the oil release rate is less than 70% of the rated volume, the gearbox must be flushed; Less than 50% of the rated volume requires multiple washings; Oil change completed T1 low-speed running in, check all seals for leakage.
Maintenance checklist
Drain oil, rinse, and add oil to the gearboxes of A1-A6 shafts; Each axis needs to be placed in a designated position to ensure that the oil discharge port is at the lowest point; The oil change posture of the P-C gearbox for ceiling models is different from that of ground models, and the manual specifically provides the steps for changing oil for ceilings.
Balance cylinder: complete steps for pressure detection, bellows sealing inspection, bearing lubrication, assembly disassembly and replacement; Distinguish the disassembly and assembly process of balance cylinders for ground and ceiling models.
Whole machine cleaning: Only solvent-free water-soluble neutral cleaning agents are allowed; It is strictly prohibited to use high-pressure steam jet to clean the robot body.
Maintenance
High risk maintenance operations; To disassemble motors A2/A3/A5/A6, it is necessary to use a sling to mechanically lock the arm body and lock the balance cylinder; Failure of power-off brake and accumulation of balance cylinder energy may cause the arm to fall under its own weight, posing a risk of fatal compression; There are additional locking requirements for the maintenance of suspended ceiling P-C models.
General process for motor replacement: Disconnect the motor from the encoder connector; Remove the bolts; Apply Microlube GL261 lubricating grease to the involute spline of the new motor; Replace all O-ring seals with new ones; Do not install the motor at an angle; Tighten the bolts diagonally in stages; Restore the connector.
Motor replacement completed: The axis must undergo mastering zero calibration; T1 low-speed test run.
Including the complete disassembly and assembly steps of A1-A6 motor, A4/A5 drive shaft, and Inline hollow wrist assembly; The wrist assembly is heavy and requires the use of a crane.
Electrical system: micro RDC box, complete set of electrical schematics for motor, brake, temperature feedback, and encoder.
Priority should be given to using KUKA original spare parts for spare parts; A repair report is required for the return of faulty parts.
Shutdown, Storage, and Scrap Disposal
Dismantling process: The robot moves to the standard transport posture; Emergency stop, lock and power off; Dismantling tools and fixtures; Disconnect the cable and ground it; Loosen the M24 bolts on the base, lift the body vertically, and protect the positioning pin; The dismantling of suspended ceiling models must be carried out vertically.
Storage conditions: The storage location should be dry and dust-free, avoiding condensation and direct sunlight; Storage -40~60 ℃; Clean and cover the body, remove tool accessories; Electrical joint sealing protection requires the placement of desiccants.
Scrap and dismantle
Classification and recycling of cast aluminum, cast steel, steel, copper cables, and electrical components; Waste gear oil should be treated as hazardous waste.
Before dismantling and scrapping the balance cylinder, it must be thoroughly depressurized; Internal storage of high-pressure nitrogen gas poses a risk of explosion if not depressurized.
Options
Brake release device: Emergency manual joint movement for power failure, limited to personnel rescue and escape.
After using the release device to move the joint, all axes must be recalibrated and the brake must be fully functional tested to prevent injury from collision.
PURGE A/B/C/D positive pressure blowing kit (special for F-casting version): maintains a slight positive pressure inside the body to prevent dust and thermal splashes from entering; Installation, debugging, and maintenance steps.