KUKA KR C5 slim-2 Robot Controller
KR C5 slim-2 robot controller body. The controller is a drawer pull-out module with a protection level of IP20, and must be installed in a KR C5 compactcab/smallsizecab cabinet to achieve IP54 protection for industrial sites; Run the iiQKA.OS system, supporting up to 6 axes of the main body, can be extended with an external L3EA drive box for external servo axes, and is compatible with the smartPAD-2 teaching pendant. For engineering personnel with backgrounds in electrical electronics and industrial automation, it is recommended to attend KUKA College training.
Product Description
Complete robot system: robotic arm body+KR C5 slim-2 controller module+teaching pendant+cables+iiQKA.OS software+options. The controller is divided into two main modules: Control Unit and Power Unit.
It is strictly prohibited to dismantle the power unit housing without authorization, as there may be fatal high voltage inside.
Hardware composition
Control Unit
Mini CSP panel: mode, operation, fault LED status indicator lights, soft power button;
NextGen system motherboard, equipped with microSD card (storage robot configuration) and SSD hard drive;
Optional boards: IFBstd standard IO board, IFBsafe safety board, IFBsafext safety expansion board, KAI artificial intelligence board, Ethernet expansion board;
Built in cooling fan.
Power Unit (KSP-600)
FCU (power supply unit), SCU (servo safety control unit);
Generate DC intermediate circuit bus voltage, complete motor and brake control, monitor brake mode bus voltage.
Interface Overview
Rear interface (XD series)
XD1: Three phase main power supply; XD2: 24V UPS power supply; XD3: Braking resistor; X1003 cabinet fan.
Front interface (divided into four categories: safety, communication, IO, and motor brake)
Security interface: XG58 external enable/additional emergency stop; XG11.1 Basic Discrete Safety IO; XG11.3 Safety Extended IO; XG13.1/XG13.2 (SafeOperation option); XG42 reference switch input; XG11.2 US2 peripheral contactor control;
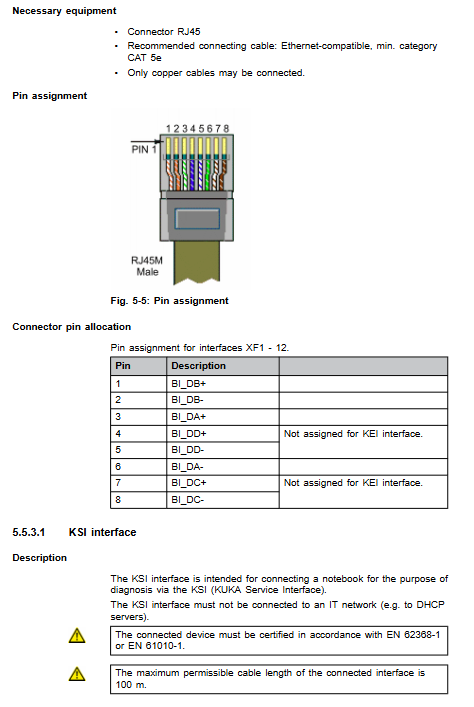
Network port XF1-XF12: KSI, KLI-OT, KLI-IT, Daisy Chain cascade, KEI EtherCAT, KAI board AI network port; Support PROFIsafe/CIP Safety/FSoE Ethernet safety; After enabling Ethernet security, the XG11 and XG13 discrete security interfaces are no longer evaluated by the controller, so choose one of the two;
XG12:16 input/16 output non safety IO, can switch high/low side according to 8-channel jumper;
XF21: RDC robotic arm data interface; XF21.1: External L3EA external shaft drive box;
XD20.1-XD20.6 motor connector (A1-A6 axis); XD10.1/XD10.2 brake connector;
XG33 rapid measurement input+”Drives ready” indicator light output;
XG19.1 teaching pendant interface.
Cooling and usage
Fan air cooling for heat dissipation, the air inlet and outlet must be kept unobstructed and not blocked;
Designated use: Drive KUKA industrial robotic arm, expandable external shaft;
Misuse: Used as a stepping stone, outdoor use, explosion-proof, radioactive, underground mining environment. Misuse results in the loss of all warranty.
Available Options
USS 2-compact interface board: Safety control peripheral 24V load;
Ethernet expansion board, capable of expanding multiple RJ45 network ports.
Security Chapter
The controller belongs to partially completed machinery and cannot be directly put into production; The system integrator completes a complete risk assessment and issues an EC compliance statement; Safety performance EN ISO 13849-1 Cat.3/PL d, PFH<1 × 10 ⁻⁷, design life of 20 years; Emergency stop, enable switch, and safety output relay must undergo a complete functional test at least once every 12 months.
1) Stop category (following EN 60204-1)
STOP0: Immediately cut off the power supply for the drive and brake, and turn off the STO+SBC safety torque; Fault scenario triggering;
STOP1: Controlled deceleration shutdown, complete shutdown and cut off the driving power supply; Emergency stop triggered;
STOP2: Keep the drive powered on and perform static monitoring.
2) Personnel Definition
Distinguish between system integrators, operators, debugging and maintenance personnel, and cleaning personnel; Only qualified personnel who have received specialized training are allowed to carry out hardware installation and debugging.
3) Workplace/Hazardous Area
Dangerous zone=working space of robotic arm+stopping distance of robotic arm/external axis;
Stop distance test conditions: The robotic arm loads the actual tool and load, runs for about 1 hour to reach the working temperature, tests STOP0 and STOP1 multiple times, and takes the worst operating condition result.
4) Operation mode
Mode Usage Speed Rules
T1 manual deceleration, demonstration, program verification TCP maximum 250 mm/s, overspeed triggers STOP1, must be held down to enable the middle position
T2 manual high-speed testing allows>250 mm/s, but teaching programming is prohibited
AUT standalone automatic mode program setting speed
AUT-EXT upper PLC external automatic mode program setting speed
Prohibiting mode switching during program execution will trigger STOP1 shutdown.
5) Core security functions
Emergency stop
Local emergency stop: smartPAD-2 teaching pendant emergency stop; Unplug the teaching pendant and the emergency stop will fail;
Mandatory additional configuration of external emergency stop; Press to execute STOP1;
Support notebook+smartPLUG as a special working condition for teaching pendant, which must be configured with physical emergency stop near the notebook.
Three position enabling device
SmartPAD-2 enables multiple sets of three positions: release → STOP2; Completely press the panic button → STOP1;
Support XG58 external three position enable switch;
It is prohibited to physically fix the switch with tape, zip ties, etc.
Operator safety (safety door monitoring)
AUT/AUT-EXT mode takes effect; Opening the safety door triggers STOP1;
Prohibit automatic reset of door closing, external confirmation button is required.
T1 mode speed monitoring: Machines with RDC/TPC safety position detection, T1 mode TCP 250 mm/s for safety monitoring; There is no safe location detection model, and this monitoring is only used for device protection and does not belong to safety functions.
Startup mode (only available in Ethernet security mode): T1 mode bypasses external Ethernet security signals and is used for unfinished debugging of security fences; It is necessary to isolate the danger zone and use it as little as possible.
Additional protection: software limit, mechanical hard limit; Manual release of the brake without driving energy (limited to rescue, may damage the brake).
SPOC single point control security: Submit interpreter PLC、OPC‑UA、 Remote tool access robot; T1/T2 mode requires $SAFETY-MOTION-ENABLE condition; The backend prohibits rewriting motion related variables such as speed and magnification.
6) Key points for homework safety
After a power outage, the maximum voltage of the intermediate circuit is 800 VDC. To repair the power outage and unplug the power cord, it is necessary to wait for at least 5 minutes for discharge; Implement the 5-step method for electrical safety; ESD anti-static throughout the process.
New programs, modified programs, simulation export programs, and physical machines must prioritize T1 mode testing.
Maintenance and repair must be powered off, locked, and tagged; Live operation is limited to T1 mode only, emergency stop must remain available.
Safety acceptance: After initial operation and hardware/safety ID modification, safety acceptance must be completed and a written record must be kept.
Brake testing: Can perform brake testing to evaluate brake wear; After risk assessment, it can be discontinued.
Peripheral devices: Automatic reset for safety IO fault recovery, there is a risk of automatic restart of peripheral devices, and integrators need to take suppression measures.
7) Reference standards
Mechanical Directive 2006/42/EU, EMC Directive 2014/30/EU, EN ISO 13849-1/2, ISO 10218-1, EN 60204-1, NFPA79, UL North American series standards.
Technical data
Basic Parameters
Project parameters
The maximum servo axis body has 6 axes; External L3EA drive box with extended external shaft
The weight of the controller module is approximately 18 kg
The protection level of the body is IP20 (the whole machine is IP54 after being installed in the cabinet)
Noise<71 dB (A)
Power supply three-phase AC380-480V ± 10%; 50‑60Hz;5kVA; TN must be grounded to the neutral power grid
Leakage current ≤ 150 mA; minimum 3 × 10A slow melting and maximum 3 × 16A slow melting of incoming fuse
Environmental temperature operation -5~+45 ℃; Storage -20~+40 ℃; Remove battery -20~+70 ℃, no condensation
Do not reduce power when the altitude is ≤ 2000 meters; For every 1000 meters increase in 2000-3000 meters, the capacity decreases by 5%; No automatic capacity reduction, manual intervention is required
Vibration shock operation 0.5g continuous vibration, shock 2g; transportation shock 10g (11ms half sine wave)
Safety IO electrical specifications
Safe output: maximum 30 V, current 10-500 mA; cable length up to 50 m; 20-year design life, maximum 9.5 million switching times, module replacement upon expiration;
Safe input: 5-11V is an undefined transition interval; ≤ 5 V disconnection, ≥ 11 V conduction; Dual channel TA-A/TA-B alternating 600 µ s pulse fault detection; Only passive floating contacts are allowed to be connected.
Machinery and nameplates
Controller module size 422.4 × 400 × 186.5 mm;
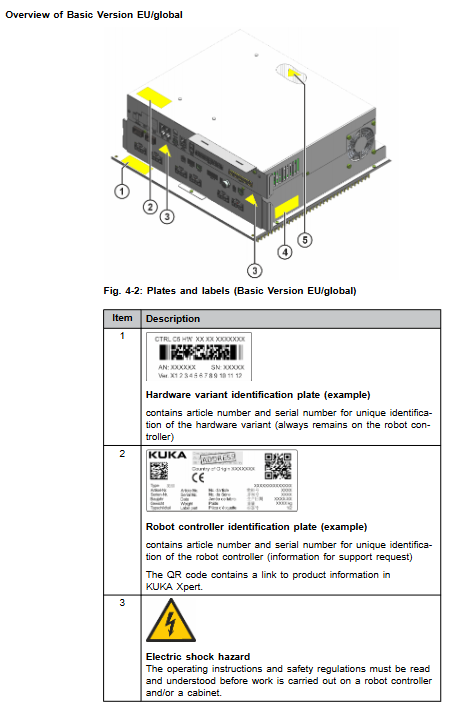
The nameplate, high voltage warning, and QR code KUKA Xpert link label are strictly prohibited from being torn off;
REACH regulation SVHC substance inquiry KUKA Xpert.
System Planning
EMC electromagnetic compatibility: EN55011 Class A Group 1 industrial equipment; All external communication cables must use shielded cables, with the shielding layer extensively grounded.
Installation requirements
The module must slide into the KR C5 compactcab/smallsizecab cabinet rail;
The controller body has an IP20 rating and cannot be used in bare metal industrial applications; Conductive dust and condensation environments must have cabinets with an IP54 rating or higher;
Keep the air inlet and outlet unobstructed; PE equipotential connection, the mechanical arm controller, controller plant total PE busbar must be reliably grounded.
Cable laying
Fixed wiring bending radius ≥ 3-5 times the outer diameter of the cable; Within the drag chain, the outer diameter of the cable should be ≥ 7-10 times;
Separate the wiring of motor power cables and signal data cables;
After replacing the XF21 RDC data cable, all axes must undergo mastering calibration again;
The motor plug needs to be equipped with a coding pin to prevent incorrect insertion.
Key points of detailed interface planning
XD2 UPS interface: must be connected to an external 24V UPS power supply; Running without UPS will result in loss of location and configuration data, and it is prohibited to operate without UPS powered on; During the initial power outage, the maximum is 6.5A, and during the shutdown phase, the maximum is 4A;
The security interfaces XG11.1, XG58, XG11.3, and XG13 all prohibit hot plugging and can only be plugged and unplugged in a power-off state;
XG12 ordinary IO, switching high/low side modes with a set of jumper wires for 8 channels; The XD12 power supply is an external 24V PELV;
Network port: KSI service port is strictly prohibited from accessing the enterprise LAN; KLI-OT is used for PLC fieldbus; KLI-IT is used for OPC UA and backup cloud monitoring; KEI supports EtherCAT/FSoe; Daisy Chain is used for cascading multiple robot RoboTeams;
XG33 fast measurement input, can be connected to external sensors, and can also be connected to the Drives Ready indicator light;
Ethernet safety (PROFIsafe/CIP Safety/FSoE) has been enabled, and all XG11/XG13 discrete safety IOs will no longer participate in safety assessments. The hardware wiring will still be retained, but the logic will fail;
Safety performance: PFH<1e-7; Cat.3 PL d; Prerequisite: Annual comprehensive safety function testing.
Transportation
Unplug all cables, close the cover plate, and place the trolley horizontally for transportation; Ensure proper anti fall fixation to avoid impact and vibration;
Prohibition of savage falls; Hanging and hoisting the controller module is not allowed.
Power on and restart
Complete commissioning process
Visually inspect the controller and robotic arm to confirm that there is no condensation inside the cabinet;
Slide the controller into the rack rail and lock it; Backboard XD1/XD2/XD3 automatically connects to the cabinet backplane;
Complete the equipotential grounding of the robotic arm and control cabinet PE, and connect the control cabinet to the protective ground in the factory area;
Laying motor cables, XF21 RDC robotic arm data cables, and installing coding pins; Cable stress release, avoid pulling and pulling;
Plug in safety interface XG11.1/XG58 in power-off state; Connect teaching pendant XG19.1;
Confirm that the UPS battery protection plug in the cabinet has been restored;
Hardware changes (replacement of boards and hard drives) require the use of iiQWorks.Sim to regenerate and download project configurations; Directly interchange hardware of the same model;
Enable Startup mode as needed; Confirm that there are no people in the danger zone and all safety measures are in place; Close the main switch of the cabinet and turn on the power;
Startup sequence: Restore USB drive → External hard drive → Internal SSD; Identifying external hard drives will disable internal SSDs;
Software debugging: machine data verification, no-load calibration, load calibration, TCP tool calibration, load input, software limit setting, AUT-EXT external automatic interface configuration.
Run
Soft power button: Short press to execute normal system shutdown; Long press for ≥ 5 seconds to force a hard power outage (try to avoid it as there is a risk of damaging the system);
Power off operation of the whole machine: Disconnect the main switch of the cabinet and lock it with a tag.
Maintenance
Turn off the power and unplug the power cord, and force the intermediate circuit to discharge for at least 5 minutes; ESD anti-static throughout the process; Do not use compressed air or spray water for cleaning.
maintenance cycle
Every 12 months
Complete functional testing of all emergency stops and all enable switches (press the panic button for 3 seconds to stop the machine);
Drive ready indicator light function test;
IFBsafe/IFBsafext safety output relay testing;
Depending on the degree of pollution: clean the heat dissipation fins and fan;
10 years: Replace the CR2032 button battery on the motherboard.
Maintenance safety mandatory regulations
Power off, lock and tag, disconnect the incoming power supply; Wait for 5 minutes to discharge; Implement the 5-step method for electrical safety; ESD protection;
High voltage still exists after the motor and power unit are powered off;
After repair, a complete set of safety function acceptance tests must be performed.
Repair
Only the project described in this manual allows on-site maintenance; Other repairs must be carried out by KUKA trained personnel; KUKA original spare parts must be used. Unified pre safety process: power off → unplug power cord → wait for 5 minutes for discharge → ESD protection; The controller needs to be removed from the cabinet rail as a whole for maintenance.
List of parts that can be replaced on-site:
System motherboard button battery CR2032 (BIOS reset system date and time after replacement);
Interface board blade fuse;
Mini CSP panel CSP communication cable;
IFBsafe safety interface board;
IFBsafeext security extension interface board;
IFBstd standard interface board;
NextGen system motherboard;
KAI Artificial Intelligence Board;
Power unit and system motherboard connection board;
Cooling fan module;
Complete set of Power Unit (replacement requires dismantling all upper board cards);
USS 2-compact option board, Ethernet expansion option board.
After the repair is completed and the cabinet is reinstalled, power on and perform a safety function acceptance test.
Troubleshooting
Mini CSP panel LED fault code, system motherboard hardware fault LED;
KR C5 Recovery Image: Create a recovery USB drive and follow the system recovery operation process.
Discontinue, store, and dispose of scrap
Retired shutdown: power off and lock, disconnect all cables, and remove the controller module from the cabinet;
Storage: Indoor dry and dust-proof, batteries are separately removed and stored; Seal the interface, dust cover+desiccant; Avoid condensation;
Scrap disposal: Circuit boards shall be disposed of as electronic hazardous waste; Button batteries should be recycled separately, and disposal of household waste is prohibited.
Options
USS 2-compact interface board: provides safe controlled 24V load output for USS 2, including supporting power supply and feedback loop; Complete replacement and functional verification process;
Ethernet expansion board: Expand multiple RJ45 network ports, replacement and disassembly steps.