KUKA KR C4 Midsize/KR C4 Midsize CK Assembly Manual
The original English assembly guide document for the KUKA KR C4 midsize robot control cabinet covers all aspects of product introduction, technical parameters, safety specifications, planning and design, transportation, and startup debugging. It is aimed at engineering personnel with expertise in electrical, robot control cabinets, and Windows systems. The copyright of the document belongs to KUKA Deutschland GmbH and cannot be copied or transmitted without permission.
Product Description
The entire industrial robot consists of a robotic arm body, a control cabinet, a smartPAD teaching pendant, connecting cables, software, and optional accessories.
Core hardware of control cabinet
KPP (KUKA Power Pack): Drive power supply, rectifies AC power into DC bus voltage, supplies power to servo modules, built-in brake chopper, provides 4 hardware specifications, with status LED.
KSP (KUKA Servo Pack): Axis servo drive, 3 specifications, responsible for servo motor field oriented torque control.
KPC controls PC: runs HMI interface, program editing, path planning, driver control, safety monitoring, external communication; Supports multiple motherboards including D2608-K/D3076-K/D3236-K/D3445-K.
CCU cabinet control unit: the central power distribution and communication hub of the whole machine, consisting of CIB cabinet interface board and PMB power management board; Manage battery backup power supply, fan, temperature acquisition, safety IO, and main contactor. Safely shut down during power outage by relying on the battery to save location data.
SIB security interface board: divided into standard SIB and extended SIB; Standard board with 5 secure inputs/3 secure outputs; Expansion board with 8 inputs and 8 outputs, used for monitoring the axis range of SafeRobot safety options.
RDC rotary digital converter: installed on the base of the robotic arm, it can collect up to 8 motor rotary positions and motor temperatures; On board EDS non-volatile memory storage location, robot configuration data.
CSP system panel: Status LED indicator light, equipped with USB, KLI, KSI service interfaces.
Battery pack: achieve controlled shutdown of the control cabinet after power failure; During storage, it is necessary to replenish power according to the temperature cycle.
Other components: Low voltage power supply, power grid filter; Optional smartPAD bracket and caster components.
Three sets of internal buses
KCB library card controller bus: connects KPP, KSP, RDC, CIB, EMD.
KSB library card system bus: connects CIB, SION, teaching pendant, SIB security board.
KEB library card expansion bus: external PROFIBUS, DeviceNet, EtherCAT, digital/analog IO expansion modules.
Interface panel
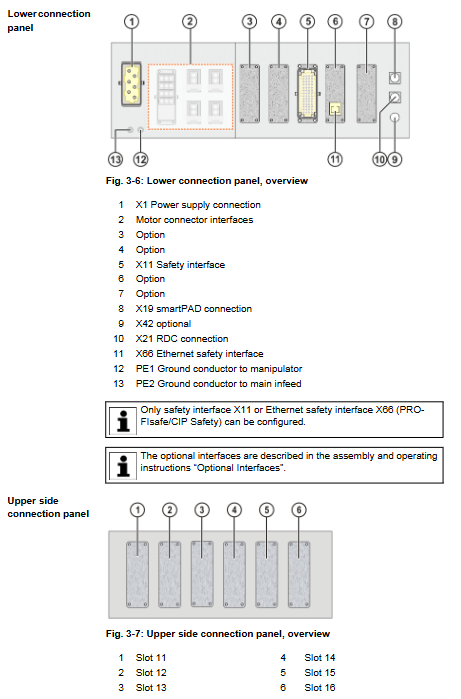
Lower connection panel: X1 Hartning main power supply, X11 discrete safety interface, X66 Ethernet safety interface (PROFIsafe/CIP Safety, choose one of X11 and X66, cannot be used simultaneously), X19 teaching pendant port, X21 RDC data port, motor connector, PE protective grounding terminal.
Upper slot panel: used for installing customer option cards.
Cooling structure
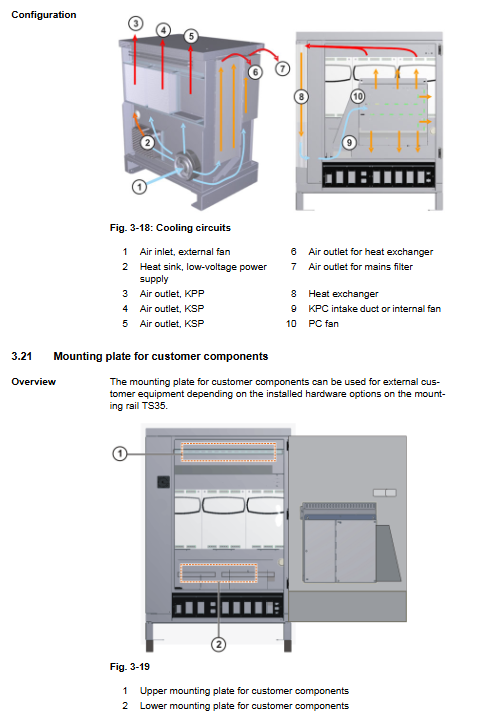
The control cabinet is divided into two cooling circuits: the internal electronic components are cooled by a heat exchanger; Braking resistors and KPP/KSP heat sinks are directly cooled by ambient air; It is prohibited to install filter cotton on the ventilation opening, as it will increase the temperature and shorten the lifespan of the device.
Technical Data
Basic parameters of cabinet body
Color: Cabinet RAL7016, cabinet door card orange; Maximum 9-axis; Weight 160 kg; protection level IP54; Noise level is 67 dB (A).
Power supply: Three phase 3 × 380/400/440/480 VAC, allowable ± 10%; Frequency 49-61 Hz; must use a neutral grounded power grid, and ungrounded neutral must be equipped with a transformer.
Environmental temperature: Operating with cooling unit+5~+50 ℃; Without cooling+5~+45 ℃; Equipped with battery storage -25~+40 ℃; Remove battery storage -25~+70 ℃.
Altitude: ≤ 1000 m without power reduction; For every 1000-4000m increase, the power decreases by 5%.
Battery storage charging cycle: ≤ 20 ℃, charged every 9 months; 20-30 ℃ every 6 months; 30-40 ℃ every 3 months to prevent battery damage caused by over discharge.
Size and installation clearance (unit: mm)
Cabinet appearance: Width 792, Depth 558, Height 1262.5.
Minimum clearance: 300 above, 50 on the side, and 100 behind; It is necessary to ensure that maintenance operations are accessible.
Cabinet door opening angle: about 180 ° for independent cabinets; Install side by side at approximately 155 °.
SIB safety interface board electrical and cable specifications; External 24V PELV safety power supply parameters; Drawing parameters for installation holes of casters, smartPAD brackets, and footings.
REACH regulation: CR2032 button batteries contain the SVHC substance of high concern, 1,2-dimethoxyethane.
Security Chapter
Responsibilities and Mechanical Instructions
Robots belong to partially completed machinery and cannot be directly put into use; It must be integrated into the entire equipment and an EC conformity declaration must be issued by the system integrator; The control cabinet has EMC and low voltage CE markings.
It is prohibited to modify robot hardware and software without permission from KUKA; Any damage caused by third-party installation of accessories shall be borne by the user.
Personnel Definition
Distinguish between users, system integrators, and operation/maintenance/cleaning personnel; Only personnel who have received specialized training are allowed to install, debug, and repair robots.
Regional Definition
Workplace: Robot motion range; Dangerous zone=workspace+stopping distance of each axis; The safe zone is outside the danger zone.
Stop categories STOP0 (immediately cutting off the drive and brake), STOP1 (cutting off the drive after the brake stops), STOP2 (keeping the drive active, monitoring stationary), according to EN 60204-1.
Operating Mode
T1: Manual deceleration mode, maximum TCP speed of 250 mm/s; Speed monitoring, overspeed triggers STOP0; Need to confirm the enable switch.
T2: Manual high-speed mode, allowing speeds greater than 250 mm/s.
AUT automatic mode; AUT EXT external automatic mode.
Core Security Functions
Emergency Stop: The teaching pendant comes with an emergency stop, and the system must be additionally configured with an external emergency stop; Press to execute STOP1.
Enabling device: smartPAD three position enabling switch; Release=STOP2; Completely press the dead panic position=STOP1. Can be externally enabled.
Operator safety (safety door): only effective in automatic mode; Opening the safety door triggers STOP1; To rerun, an external confirmation button is required and automatic confirmation is prohibited.
External safety signal: External safety operation stop, external safety stop 1/2.
Additional protection: software limit switch, mechanical hard limit switch; Manual release of the brake without driving energy (limited to emergency rescue, may damage the motor brake).
The safety function meets EN ISO 13849-1 Cat.3 PL d; the emergency stop device is required to be pressed and tested at least once every 12 months.
Safety measures for various types of homework
General: It is prohibited to stand under the robot arm; After a power outage, the robotic arm may still fall and must be mechanically fixed; The safety function is strictly prohibited from removing the shield.
Transportation: Follow the prescribed transportation posture and avoid impact and vibration.
Start up debugging: Conduct visual inspection and safety function testing of the entire machine before powering on; After modifying machine data, actual verification testing must be conducted; Provide Startup Mode, which can move the robot in T1 mode when the external safety fence is not installed. This mode will block external safety protection and must restrict personnel from entering the danger zone.
Manual demonstration: T1 is prioritized for testing new programs; T2 mode does not allow teaching programming.
Simulation: When downloading simulation programs to physical robots, T1 testing is required first.
Automatic mode: All safety measures are complete, and there is no one in the danger zone.
Maintenance and repair: power off, lock and tag; After the DC bus is powered off, the maximum residual voltage is 780 VDC, and it is necessary to wait for 180 seconds for discharge; Maintenance follows ESD anti-static measures; The balance cylinder belongs to pressure equipment.
Retirement, storage, and disposal: comply with local regulations.
Single point control SPOC security: Submit interpreter PLC、OPC、 Remote tool access to robot security restrictions to prevent backend rewriting of motion related variables.
Reference Standards
Machinery Directive 2006/42/EU, EMC Directive 2014/30/EU, Pressure Equipment Directive, ISO 10218-1, ISO 13849 series, ISO 13850, EN 60204-1, etc.
System Planning
EMC Electromagnetic Compatibility
The control cabinet belongs to Class A industrial equipment; All external incoming lines use shielded cables, and the shielding layer is extensively crimped with PE bars.
Installation conditions
Reiterate cabinet dimensions, minimum maintenance clearance, and cabinet door swing range.
Wiring conditions
Power supply requirements, maximum leakage current of 300 mA, key points for selecting leakage protection devices; Cable specifications; SmartPAD can be extended up to two sections, with a total length of ≤ 50 μ m; the cable length difference of each channel in RDC is ≤ 10 μ m; PE equipotential connection: a 16mm ² cable must be used between the robotic arm and the control cabinet; A 16mm ² cable is also required from the control cabinet to the main PE row.
Interface Explanation
X1 Hartning main power connector;
Motor connectors: X20, X81, X7. x series, supporting up to 9-axis body+external axis; Provide a detailed allocation of pins for each plug and a combination wiring table for different axis configurations.
X11 discrete safety interface Han108DD plug: dual channel emergency stop, safety door, external enable switch, safety stop input/output; Provide wiring schematic diagram; The safety input adopts dynamic pulse testing TA-A/TA-B to achieve Cat.3 PL d.
X66 Ethernet Safety Interface (PROFIsafe/CIP Safety): defines the meaning of each signal in the input and output bytes, supports SafeOperation safety options, axis monitoring, space monitoring, and tool selection.
CIB board X44 EtherCAT interface, optional X65 output to outside the cabinet.
Important: Choose between X11 discrete security interface and X66 Ethernet security interface, they cannot be enabled simultaneously.
System configuration modification conditions
Hard disk replacement, hardware model change, and addition/removal of bus devices require the use of WorkVisual software to regenerate the download project; Directly exchanging hardware of the same model is not necessary.
PFH failure rate
The KR C4 midsize set of safety features has a PFH<1 × 10 ⁻⁷, meets PL d level, and is based on a 20-year service life.
Transportation
Three transportation methods: lifting with lifting equipment, forklift, pallet truck, and optional casters.
Preconditions: Power off the control cabinet, unplug all cables, close the cabinet door, install anti tipping brackets, and maintain an upright position.
Lifting: Use M10 lifting ring screws; The angle of the suspension rope should be ≥ 60 °, and incorrect diagonal pulling is prohibited.
Forklift: Standard base, fork slot version, with transformer, with caster version for different fork positions.
Casters are only used for short distance movement inside the cabinet group, and long-distance dragging and transportation are prohibited as there is a risk of tipping over.
Startup and restart
The complete startup process is divided into three parts: mechanical arm body inspection, hardware installation and wiring, and software debugging.
The control cabinet is in place to meet the clearance requirements; Check for transportation damage; Confirm that there is no condensed water vapor inside the cabinet.
Laying connection cables: motor cable, data cable X21; Separate power cables and data cables, paying attention to the bending radius; After replacing the data cable, the robotic arm must be recalibrated.
Install the smartPAD bracket and plug in the X19 teaching pendant; After unplugging the teaching pendant, the emergency stop of the pendant becomes ineffective, and an external emergency stop is essential.
Connect the 16mm ² equipotential PE protective grounding and conduct a fault circuit impedance test according to EN 60204-1.
X1 is connected to the main power supply; Restore battery discharge protection plug X305 (factory disconnected to prevent depletion of transportation and storage batteries).
Configure connection security interface X11; Note that X11 must be powered off and plugged in.
Hardware changes are updated with WorkVisual to update system configuration.
Enable Startup mode when needed; Close the main switch and turn on the power.
Software steps: Check machine data, calibrate robotic arm without load, install tool with load calibration, set software limit, calibrate TCP tool, fill in load data, calibrate base; Configure PLC external automatic interface.