ADLINK STC2-AL/KL series intelligent touch computer
ADLINK STC2-AL/KL series industrial fanless touch all-in-one machine user manual, fully covering product overview, hardware specifications, mechanical dimensions, interface definition, BIOS detailed settings, driver installation, safety specifications, and all other contents. This series is designed for harsh working conditions such as industrial automation, food and beverage, buildings, transportation, medical, and factories. The front panel is IP65 protected and has a projected capacitive ten point touch. It is divided into two sub series: AL low-power platform and KL high-performance platform.
Product Overview and Main Features
Platform differentiation
STC2-AL series: Intel Atom x7-E3950 (4-core, 12W), focusing on low power consumption; Model: STC2-10WP-AL (10.1 inches), STC2-15WP-AL (15.6 inches).
STC2-KL series: Intel Core i3-7100U/i5-7300U/i7-7600U, focusing on high performance; Model: STC2-10WP-KL, STC2-15WP-KL, STC2-21WP-KL (21.5 inches).
Core Features
Wide voltage DC power supply: 9-36VDC input, can withstand voltage fluctuations;
Display output: onboard LVDS (customizable eDP), external output of DisplayPort;
Ten point PCAP projection capacitive touch with anti fingerprint coating;
Support VESA wall mounted installation;
Optional accessories: Wi Fi Bluetooth kit, 4G/LTE module, 60W/84W power adapter;
Pre installed system: Windows 10 IoT Enterprise, supporting hardware watchdog.
Packing list: 1 touch all-in-one machine; Excluding power supply and accessories, accessories need to be ordered separately.
Hardware specification parameters
1. System configuration
Memory: standard 4GB DDR3L, maximum 8GB;
Storage: Standard 64GB SSD, supporting up to 1TB;
Display screen: brightness of 400 nits, backlight life of 50000 hours, full viewing angle of 89 °;
10.1″:1280×800; 15.6 “/21.5”: 1920 × 1080.
2. I/O interface (universal across the entire series)
Interface Description
DC-IN DC power input, supports 9-36V, with overvoltage/undervoltage protection
COM1, COM2 DB9, BIOS switchable RS-232/RS-422/RS-485
USB 1 x USB 3.2 Gen1, 1 x USB 2.0, with overcurrent protection
DisplayPort DP1.4, Supports up to 5120 x 3200@60Hz , can be converted to HDMI/DVI/VGA
Audio 3.5mm Line Out Audio Output
Two RJ45 Ethernet ports; AL Gigabit, KL up to 2.5Gbps (Intel I225 controller)
Expand Mini PCIe slot for Wi Fi/Bluetooth, 4G modules
3. Environment and Machinery
environmental conditions
Working temperature: -10 ℃~+50 ℃ (SSD); Storage -20 ℃~+60 ℃;
Humidity: 10-80% @ 40 ℃, no condensation;
Vibration resistance: 1G random, 5-500Hz; Impact resistance: 20G, 11ms;
Protection: IP65 front panel, IP20 rear panel; Certified CE and FCC.
Power consumption (12V full load)
STC2‑10WP‑AL:29.4W; STC2‑15WP‑AL:39.8W
STC2‑10WP‑KL:40.9W; STC2‑15WP‑KL:50.4W; STC2‑21WP‑KL:64.1W
Dimensions and Weight
Model, overall dimensions (H × W × D mm), net weight, VESA hole position
10WP‑AL/KL 256×174×44 1.9‑2.05kg 75×75 / 100×100
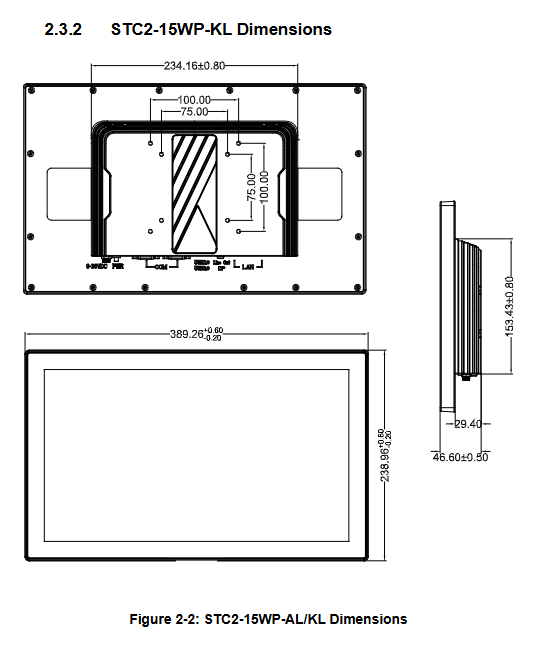
15WP‑AL/KL 390×239×47 3.16‑4.2kg 75×75 / 100×100
21WP‑KL 524×316×51 6.9kg 75×75 / 100×100
Installation: Supports panel embedded installation and VESA rear wall mounting; When installing VESA, the I/O interface must face downwards; Power off and cool down before disassembly to prevent high temperature burns.
4. Pin definition
The complete manual provides: DC-IN power pins, COM1/COM2 serial port pins USB、DP、 Ethernet RJ45 pin definition, network port with link/rate dual color LED status description.
BIOS settings (separate menus for STC2-AL and STC2-KL)
Enter BIOS: Press ESC or DEL when booting up; Hot keys: F1 Help, F8 Restore Last Time, F9 Load Default, F10 Save Exit. Modifying settings requires a restart, and incorrect settings can result in the inability to start. Both BIOS systems are divided into six top-level menus: Main, Advanced, Chipset, Security, Boot, Save&Exit.
1. Main (main interface)
Read only system information: BIOS version, CPU information, memory, card serial number, total runtime, power on times, startup reason; The system date and time can be modified.
2. Advanced (Advanced Settings, Core Configuration Area)
CPU Configuration: CPU status, SpeedStep, Turbo Turbo frequency, C-State energy-saving sleep settings;
Graphics Configuration: LVDS/EDP internal display, color depth, synchronization signal polarity, panel resolution selection;
Power Management: ACPI sleep mode, RTC timed power on, AT/ATX power simulation, real-time voltage and current monitoring;
System Management (SEMA): BMC hardware monitoring, CPU/board temperature and voltage monitoring, power on counting, error logging;
Watchdog: power on watchdog, runtime watchdog, timeout automatic reset system;
Super IO configuration: COM1 to COM4 serial ports, with separate settings for RS232/422/485 mode, IO address, and interrupts;
Serial Console redirection: supports VT100 and other terminals, configured with baud rate, verification, and flow control, used for debugging without a display;
Network Stack: UEFI network stack, IPv4/IPv6 PCIe network boot;
Trusted Computing security module: TPM1.2/TPM2.0 configuration, PCR hash library, clear TPM;
USB configuration: XHCI handover, storage driver, USB timeout, power on delay parameters.
3. Chipset chipset menu
STC2-AL: Northbridge (memory, TOLUD), non core display configuration (IGD display memory GTT/DVMT); South Bridge Cluster: HD Audio, PCIe, SATA, eMMC configuration;
STC2-KL: System Agent system agent (memory, graphics card)+PCH-IO (SATA, PCIe, USB, HD Audio, Serial IO, RTC lock, power on recovery G3).
4. Security Menu
Set administrator/user password, password length 3-20 characters, Secure Boot secure boot option.
5. Boot startup menu
Set the numeric keypad NumLock, Quiet Boot for silent boot, and Fast Boot for quick boot; The BBS boot priority of full UEFI and traditional BIOS (hard disk, NVMe, CD-ROM, USB, network PXE).
6. Save&Exit Save&Exit
Save/discard changes, restore factory defaults, save user-defined defaults, override temporary boot options, start EFI Shell.
Differences: The KL series has more options than AL, such as CSM compatibility support, VT-d virtualization IO pass through, RST storage mode, etc.
Driver and Application Installation (Windows 10 IoT Enterprise)
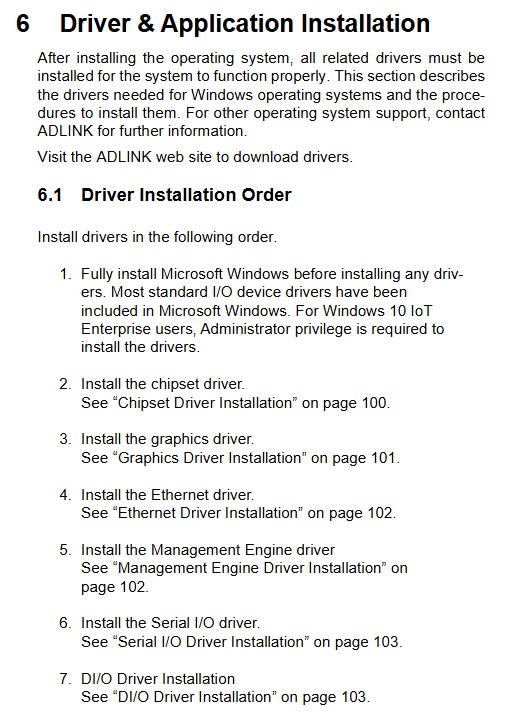
1. Mandatory installation sequence
Complete installation of Windows system;
Chipset driver → graphics card driver → Ethernet driver → ME management engine driver → serial I/O driver → DI/O driver.
All drivers are downloaded from the official website of Linghua, and the system must be restarted after each installation step is completed. The manual provides corresponding product webpage links.
Safety instructions, EMC compliance, technical support
Safety Warning
Installation and maintenance must be powered off; The operating shell of the equipment is at high temperature to avoid burns;
Built in lithium battery, replacing the wrong model can cause an explosion; Scrap must be handled in compliance with regulations;
Do not disassemble and repair the machine yourself, hand it over to an authorized engineer;
It is recommended to install it in an IT room with restricted access.
EMC electromagnetic compatibility: Class B equipment; Provide suggestions for troubleshooting CE and FCC interference issues.
Technical support: Provide contact information for branches in Shanghai, Taiwan, Taoyuan, the United States, and Germany, as well as an online technical consultation portal for Ask an Expert.