ADLINK MXC-6300 Fanless Embedded Industrial Control Computer
Product Overview and Core Specifications
1. Differentiation of Three Major Hardware Models
|Model | CPU Configuration | Computing Power|
|MXC-6303D | i3-3120ME dual core 2.4GHz, 3MB cache | Basic industrial control|
|MXC-6301D | i5-3610ME dual core 2.7GHz, 3MB, turbo 3.3GHz | Mid end universal|
|MXC-6302D | i7-3610QE quad core 2.3GHz, 6MB, turbo 3.3GHz | High performance computing|
2. Core hardware platform
-Chipset: Intel QM77 mobile platform controller, integrated with HD4000 core display;
-Memory: Double stacked SO-DIMM slots, up to 16GB DDR3 1333/1600;
-Heat dissipation: The whole machine has no passive heat dissipation architecture, and an external intelligent temperature control fan module can be selected, which is compatible with high-power expansion cards;
-Power supply: wide voltage DC 9-32V input, standard 160W power supply suitable for full load conditions;
-Size: 172.5 (W) × 213 (H) × 225 (D) mm, net weight 4.3kg, supports wall mounted installation.
3. Core characteristics of the whole machine
1. * * Three independent display outputs * *: 2 x DisplayPort+1 x DVI-I. The maximum single screen size is 2560 x 1600, supporting VGA/DVI/HDMI conversion and built-in LVDS screen interface;
2. * * Multi channel industrial communication * *: 4-channel DB9 serial port (COM1/2 supports RS232/422/485 dialing, COM3/4 only RS232);
3. * * Dual Gigabit Network * *: Intel WGI210IT+82579LM dual controllers, supporting network aggregation, IEEE1588 precise clock, iAMT 8.0 remote management PXE、WOL;
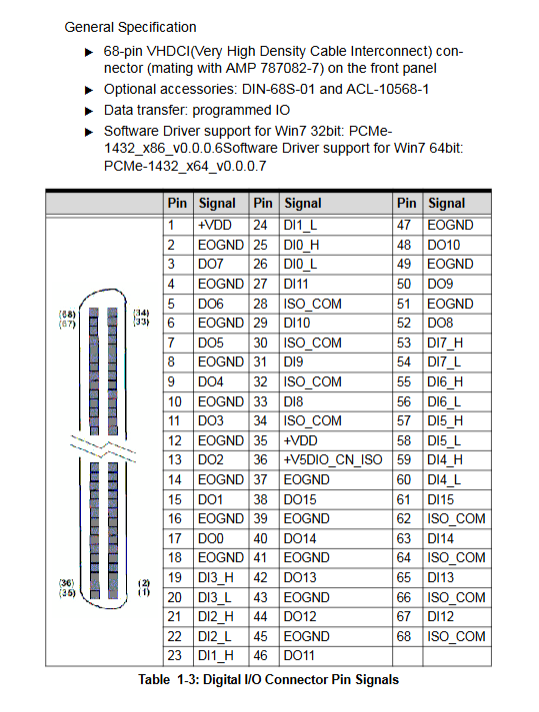
4. * * Isolation digital IO * *: 16 isolated DI+16 isolated DO, 1500V isolation, VHDCI high-density 68 pin interface, DO single peak 250mA, continuous 100mA, compatible with relays;
5. * * Multi storage solution * *: Dual built-in SATA III 6Gbps 2.5-inch disk slots (supporting RAID0/1), dual internal and external CFast Type II solid-state slots;
6. * * Rich expansion slots * *: 1 x standard 32-bit PCI, 1 x PCIe x8, 1 x PCIe x16 (two x8 mutually exclusive, can accommodate long cooling graphics cards);
7. Peripheral interfaces: 6-way USB (4 x USB 3.0+2 x USB 2.0 front end, 1 built-in USB), PS/2 keyboard and mouse, audio input/output;
8. Hardware watchdog WDT, hardware temperature/voltage monitoring, reset/power button, status indicator light;
4. Environmental and reliability indicators
-Working temperature: standard 0~50 ℃; Equipped with industrial SSD, it can reach -20~60 ℃; Storage -40~85 ℃ (excluding disk);
-Humidity: 5%~95% without condensation @ 40 ℃;
-ESD: Contact ± 4kV, air ± 8kV; impact 50G (with SSD/CFast);
-Certified CE/FCC Class A industrial standards.
5. Power consumption reference (24V power supply)
-Shutdown standby: 2.16W;
-Desktop idle: i3 16.08W/i5 16.8W/i7 18.48W;
-CPU full load full IO load: i3 53.76W/i5 67.2W/i7 91.2W;
-The recommended power supply for the entire machine is ≥ 160W, and additional power needs to be reserved when installing an expansion card.
All interface definitions
1. Front panel external IO (whole machine operation interface)
Power button (with blue light), reset button, WD/HD/DG tri color status light, 68 pin isolated DIO, 4 x USB 3.0+2 x USB 2, dual network ports, 4 DB9 serial ports, DP x 2 DVI-I、 Audio MIC/Line out, PS/2 keyboard and mouse, DC 9-32V power input, PCI/PCIe expansion slot.
Key interface details
1. * * 68 pin isolation DIO**
-DI: 0~7 differential input, 8~15 single ended, input 0~24V polarity free, 8.2k Ω current limiting resistor;
-DO: MOS leakage type output, supports external loads of 5-35V, built-in freewheeling diode suitable for inductive loads;
-Equipped with isolated 5V/180mA auxiliary power supply, providing EOGND isolation ground;
2. * * Dual network port indicator light * *: Yellow light flashes for transmitting and receiving, green/orange distinguishes 10/100/1000Mbps speed;
3. * * Display interface * *: DVI-I-compatible with analog VGA, DP supports various active/passive adapters, three screen independent output;
4. * * Serial port * *: COM1/2 switches level mode through BIOS, and all serial ports support serial port redirection for SOL remote management;
5. DC power supply three pin definition V+/GND/V -, with locking screw to prevent detachment.
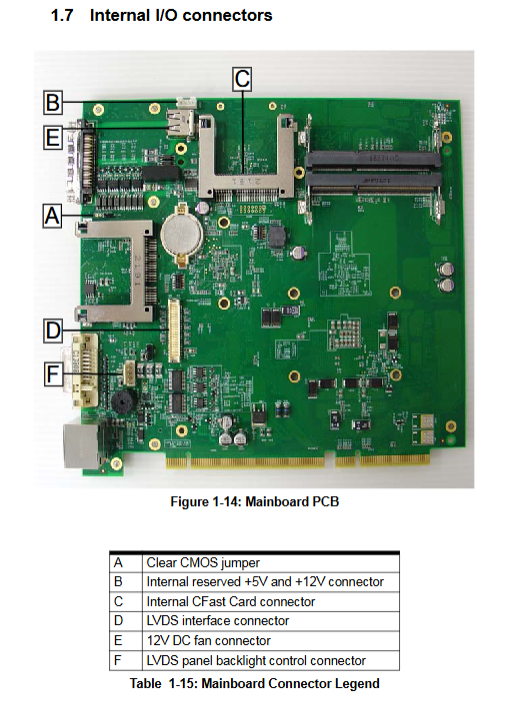
2. Internal pins built into the motherboard (for open cover use)
-Clear CMOS jumper: Restore BIOS default when abnormal and unable to start;
-Built in 5V/12V auxiliary power supply pin, providing power to the expansion card;
-Internal and external dual CFast slots;
-Dual channel LVDS LCD screen interface+backlight brightness control pin;
-12V smart fan socket (starting at 40 ℃, full speed at 80 ℃);
-Built in USB 2.0 and two SATA hard drive pins;
-Mainboard and backplane interconnect bus connector.
3. Expansion slot rules
-Configuration 1: PCI slot+PCIe x16 (full speed);
-Configuration 2: PCI slot+PCIe x8+PCIe x8 (original x16 speed reduction);
-Supports standard expansion cards up to 174mm in length, with reserved space for wide heat dissipation graphics cards.
Complete hardware installation steps
Complete disassembly and assembly process for peripherals, power off and anti-static requirements before all operations:
1. * * Unpacking and inventory * *: Host, wall bracket, screws, manual, driver CD;
2. Installation of 2.5-inch SATA hard drive: Remove the top cover → Remove the hard drive bracket → Secure SSD/HDD → Dock SATA interface for restoration;
3. Installation of PCI/PCIe expansion card: Open the cover, align it with the slot, and lock it with a fixed pressure strip;
4. CFast card installation: distinguish between internal/external slots, equipped with a limit bracket to prevent detachment;
5. DP to display device: distinguish between active/passive adapters, the large screen only supports active DP-DVI;
6. DC power supply wiring: strictly distinguish between positive and negative poles to avoid overvoltage and equipment damage;
7. Wall mounted assembly: Disassemble foot pads, fix metal brackets, and mount the entire machine on the wall;
8. Optional fan module installation: After disassembling the top cover, connect it to the 12V fan pin;
9. Heat dissipation specifications: A ventilation space of ≥ 5cm should be reserved at the top of the equipment, and a fan module must be installed for high loads.
Driver Installation Guide
Only supports Windows 7 32/64 bit systems, with a fixed installation sequence and all drivers on the accompanying All in One CD:
1. Chipset driver (QM77);
2. Intel HD4000 graphics card driver;
3. Dual gigabit network card driver;
4. ALC269 high-definition audio driver;
5. USB 3.0 controller driver;
6. Intel ME management engine driver;
7. Watchdog WDT driver and API library;
8. Isolate DIO (PCMe-1432) driver and function library.
BIOS Setting Details
Press Del to enter AMI Aptio BIOS during startup, press F7 to bring up the one-time startup menu, and access the six major configuration pages:
1. * * Main Page * *: System time, hardware health (CPU/board temperature, various voltages, fan speed), BIOS version;
2. * * Advanced Settings**
-CPU: Ruifeng, EIST energy-saving, virtualization VT-x, multi-level C-State sleep switch;
-Onboard devices: Serial port mode, Ethernet port PCIe, SATA mode (IDE/AHCI/RA), USB compatible;
-Power management: power outage recovery (power on/off/pre power off status), scheduled wake-up, watchdog power on protection;
-Serial port redirection: four-way COM, SOL remote serial port switch;
-IAMT remote management configuration;
3. Chipset chipset: graphics card output, I/O virtualization VT-d;
4. * * Boot Start * *: Start sequence, quick start, OEM boot screen, digital lock;
5. * * Security * *: Administrator/user startup password;
6. * * Save Exit * *: Save/discard modifications, load optimal/fault default values.
RAID Array Configuration
Based on Intel matrix storage technology, only dual SATA hard drives support:
1. RAID0 (stripe): improves read and write speed, with no data redundancy and complete loss of single disk damage;
2. RAID1 (mirror): Two disks are fully backed up, with high security and half the available capacity;
Operation process: Set SATA to RAID mode in BIOS → Press Ctrl+I to enter RAID ROM tool → Create array → Load RAID driver during Windows installation.
Functional API Development Library
1. Watchdog WDT (software and hardware anti freeze)
-Windows: C/C++functions InitWDT/SetWDT/Start/Reset/Stop, in seconds/minute, automatically reset the entire machine upon timeout;
-DOS/Linux: LPC low-level register operation example source code, customizable timeout time.
2. Isolation DIO Digital IO Library
Provide a complete set of APIs for Windows, Linux, and VB: initialization/release, single channel/full port read/write, DI status interrupt callback, supporting two interrupt handling methods: message notification/callback function, suitable for signal acquisition and relay control development in automated production lines.